We have already seen how to install and configure Android SDK on windows. In this post we will see how to install and configure Android SDK and ADB on Mac OSX. We are using Yosemite (Mac OSX 10.10) while writing this post.
 Now the download is complete let’s setup the ANDROID_HOME variable in path. Let's see how to modify the shell path in OSX (10.10 Yosemite) using Terminal
The shell path for a user in OSX is a set of locations in the filing system whereby the user can use certain applications, commands and programs without the need to specify the full path to that command or program in the Terminal. This will work in all OSX operating systems; Yosemite, Mavericks and Lions.
So say instead of running something like
/Users/username/Downloads/android-sdk/tools/android
You can directly run
android
The path is a bunch of absolute paths of the filing system separated by colons :
You can find out what’s in your path by launching Terminal in Applications/Utilities and entering:
echo $PATH
You should see something like
Now let’s add ANDROID_HOME variable to PATH

Kindly let us know if you face any issues, while configuring Android SDK on your Mac.
If you find this article helpful, don’t forget to share/comment.
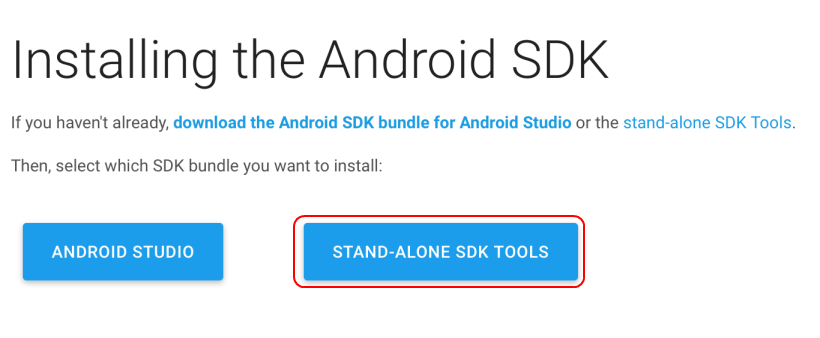
- Go to http://developer.android.com/sdk/installing/index.html
- Click and download “STAND_ALONE SDK TOOLS”
- The downloaded file will be a zip file with name like “android-sdk_r24.3.3-macosx.zip” (NOTE: version number could be different based on when you are downloading)
- Unzip the downloaded file and rename it with something shorter, say “android-sdk”
- Move the “android-sdk” directory to a location of your choice
- The Android SDK archive initially contains only the basic SDK tools. It does not contain an Android platform or any third-party libraries. We need to download them.
- To download the necessary files
- Start your terminal
- Navigate to the location where you have your android-sdk folder (#5 above)
- Navigate to tools folder
- Write “android” and hit return
- Android SDK manager will start
- In the Android SDK manager, select the packages for the Android version of your choice - I have selected Android 4.4.2 (API 19).
- SDK Platform
- ARM EABI v7a System Image
- Intel x86 Atom System Image
- Google APIs (System Image).
- Android SDK
- Android SDK Platform-tools
- Click on “Install 6 packages”
- Accept licenses and complete the install

The shell path for a user in OSX is a set of locations in the filing system whereby the user can use certain applications, commands and programs without the need to specify the full path to that command or program in the Terminal. This will work in all OSX operating systems; Yosemite, Mavericks and Lions.
So say instead of running something like
/Users/username/Downloads/android-sdk/tools/android
You can directly run
android
The path is a bunch of absolute paths of the filing system separated by colons :
You can find out what’s in your path by launching Terminal in Applications/Utilities and entering:
echo $PATH
You should see something like
/usr/bin:/bin:/usr/sbin:/sbin:/usr/local/bin
Now let’s add ANDROID_HOME variable to PATH
- Start the terminal and write “export ANDROID_HOME=/Users/username/Downloads/android-sdk” or to your location of the Android SDK directory.
- Once you have this set, you need to add the following to the PATH environment variable
- export PATH=$PATH:$ANDROID_HOME/tools:$ANDROID_HOME/platform-tools
- You can confirm that your ANDROID_HOME is set to you path by typing “echo $PATH” to terminal and hit return. You will see path to ANDROID_HOME in the result.
- BUT, once you close the terminal and start it again and check “echo $PATH” your ANDROID_HOME will no longer be available in PATH!!
- To make the new path stick permanently you need to create a .bash_profile file in your home directory and set the path there. This file control various Terminal environment preferences including the path.
- Open terminal and go your home directory
- Type “nano .bash_profile” and hit return
- This command will create the .bash_profile file with command line editor called nano!
- Add the ANDROID_HOME as following
- export ANDROID_HOME=“/Users/username/Downloads/android-sdk” or to your location of the Android SDK directory.
- Once you have this set, you need to add the following to the PATH environment variable
- export PATH=“$PATH:$ANDROID_HOME/tools:$ANDROID_HOME/platform-tools”
- Now you will have to save this .bash_profile file by press “CONTROL + o”
- Confirm the file name is “.bash_profile” by pressing return
- Exit the screen by press “CONTROL + x”. You will exit from nano.
- Close the terminal and start it again.
- Check echo $PATH, you should see path being updated.
- Now the value is permanently saved in $PATH.
Kindly let us know if you face any issues, while configuring Android SDK on your Mac.
If you find this article helpful, don’t forget to share/comment.
Comments
Post a Comment